PanelPilot M
PanelPilot M
Download PanelPilot for Windows v2.29 for customization of the original M range of PanelPilot displays, compatible with Windows 10 and 11.
IMPORTANT: Ensure that you run “Check for Updates” before uploading any configurations to the Panel Pilot device. If you are unsure how to do to this, or for any other assistance with the software, please contact our support team.
If you are unsure if this is the software you need to download, check our “Software for use with…” drop down menu to the left.
 Download Software
Welcome to PanelPilot M Software
PanelPilot is a unique Windows-based software platform that allows users to configure and customize a a range of Lascar-compatible displays with the simple click of a mouse. Choose from over 40 configurations and customize in seconds to your exact requirements. Configurations include bar-graph, tank level, analogue style, trend graphs and many more. Users can customize color’s, text labels, units and input scaling before uploading to a PanelPilot M display via USB.
Easy To Use - 6 Simple Steps
Step 1. Configurations
Users choose from an ever-increasing library of configurations including analogue, digital and bar graph styles with single or dual analogue inputs. Each PanelPilot user will automatically receive access to the latest configurations and updates each time they open the PanelPilot software.
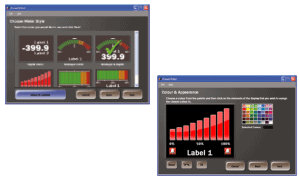
Step 2. Colors & Labels
Every element of the configuration can be individually colored. On certain configurations the ‘fX’ button will create a gradient fill across the elements. Text labels are also fully editable.
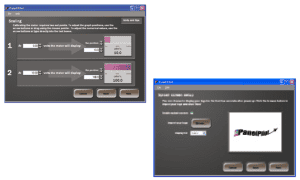
Step 3. Scaling
Voltage input levels can be set using the software. This removes the need for scaling resistors on input voltages up to 40Vd.c.
Step 4. Start Up Screen
On power-up, a PanelPilot display can be set to show an image of your choice, such as a logo
Step 5. Upload Configuration
Connect a PanelPilot compatible display to the PC with a USB cable and upload the configuration. Customized configurations can also be saved for future use.
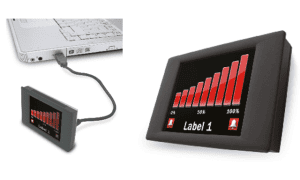
Step 6. Connect
Your PanelPilot compatible display now has your configuration saved in memory and can be connected to your application. You can reconfigure your display at any time. Just connect via USB and run through the steps above.